

The practice of regrowing vegetables from kitchen scraps is gaining significant traction, representing a powerful fusion of sustainability, economy, and home gardening. Among the easiest and most rewarding vegetables to regenerate is the scallion, also known as the green onion. This member of the allium family possesses a remarkable ability to sprout anew from its discarded base, offering a nearly endless supply from a single grocery store purchase. This process not only curtails food waste but also provides immediate access to fresh greens for culinary use. The method is straightforward, requires minimal resources, and can be adapted for any living space, from a sprawling garden to a compact apartment windowsill, making it an accessible entry point into the world of urban farming and resourcefulness.
Introduction to regrowing scallions
The economic and environmental appeal
At its core, regrowing scallions is an act of resourcefulness. Every bunch of scallions purchased contains the potential for multiple future harvests. Instead of discarding the white root ends, which are often considered kitchen waste, they can be repurposed to produce fresh green shoots repeatedly. This simple act translates into direct savings on grocery bills over time. Environmentally, it contributes to a reduction in food waste, a significant global issue. By extending the life of the food we buy, we lessen the burden on landfills and reduce the overall carbon footprint associated with food production and transportation. It is a small but impactful step toward a more sustainable lifestyle.
Understanding the biology of regeneration
The magic behind this process lies in the scallion’s anatomy. The white base of the scallion, just above the roots, contains a structure called the basal plate. This area is packed with meristematic tissue, which consists of undifferentiated cells capable of division, leading to new growth. When provided with water and light, these cells activate, pushing out new green shoots from the center of the cutting. Initially, the cutting draws energy from the bulb itself, but once green leaves develop, it begins to photosynthesize, creating its own energy for sustained growth. This biological resilience makes the scallion an ideal candidate for simple vegetative propagation at home.
This inherent ability to regrow makes scallions a perfect subject for accessible home gardening projects, requiring only a few basic items to get started.
Materials needed for growing scallions
Essential starter kit
Beginning your scallion regrowth journey requires very few materials, most of which are likely already in your kitchen. The initial phase is incredibly simple and serves as the foundation for long-term growth. Here is a list of what you will absolutely need:
- Scallion cuttings: The white base of scallions, with roots intact. Aim for about one to two inches of the white part.
- A narrow container: A small glass, a shot glass, or a narrow jar works perfectly. The container should be tall enough to support the cuttings upright.
- Water: Regular tap water is sufficient. Filtered water can be used but is not necessary.
Supplies for soil planting and bottle gardening
While scallions can grow in water for a period, transplanting them into soil yields more robust and flavorful growth over a longer duration. For the innovative plastic bottle method, a few extra items are required.
| Item | Description | Purpose |
|---|---|---|
| Recycled Plastic Bottle | A 1 or 2-liter plastic soda bottle is ideal. | Serves as a vertical, space-saving planter. |
| Potting Mix | A standard, all-purpose potting soil. | Provides nutrients and a stable medium for root growth. |
| Cutting Tool | Sharp scissors or a craft knife. | To modify the plastic bottle into a planter. |
| Awl or Drill Bit | A tool to poke holes. | Necessary for creating drainage and planting ports. |
Gathering these materials beforehand ensures a smooth and efficient transition from the initial water-rooting phase to a more permanent and productive growing system.
Steps for replanting scallions
Phase one: Rooting in water
The first step is to initiate growth in a hydroponic environment. After using the green tops of your scallions, take the remaining white ends. Ensure the roots are still attached. Place these cuttings root-down in your narrow glass or jar. Add just enough water to submerge the roots completely, but avoid letting the water level rise too high up the stalk, as this can lead to rot. Place the container in a location that receives ample sunlight, such as a kitchen windowsill. The most crucial part of this phase is changing the water daily. Fresh water prevents the growth of bacteria and slime, ensuring the roots remain healthy. Within a few days, you will observe new green shoots emerging from the center of the cuttings.
Phase two: Transplanting for long-term growth
After about a week in water, you should see significant green growth and a more developed root system. At this point, the scallions are ready to be transplanted into soil for more sustainable growth. The water-only method can be maintained, but the scallions will eventually exhaust the nutrients stored in the bulb, leading to thinner, less flavorful shoots. To transplant, fill a small pot or your prepared bottle planter with potting mix. Gently poke holes in the soil and place one scallion cutting in each hole, burying the roots and the white base. Firm the soil around the base to hold it in place. Water the soil thoroughly after planting. This move to a soil medium provides the scallions with the necessary nutrients to thrive for months.
The use of a recycled bottle as a planter is not just a novelty; it is a highly efficient method for urban gardeners with limited space.
Using recycled plastic bottles
Creating your vertical planter
Transforming a plastic bottle into a functional hanging garden is a straightforward process. First, ensure the bottle is clean and dry. Using a craft knife or sharp scissors, carefully cut off the top conical section of the bottle. This top part can be inverted and placed inside the bottle’s opening to act as a funnel for watering, though this is optional. Next, using a heated awl, a drill, or the tip of a hot glue gun, create several drainage holes in the bottom of the bottle. This step is critical to prevent waterlogging and root rot. Then, along the sides of the bottle, create several planting ports. These should be circular holes, about one inch in diameter, spaced a few inches apart in a staggered pattern around the bottle.
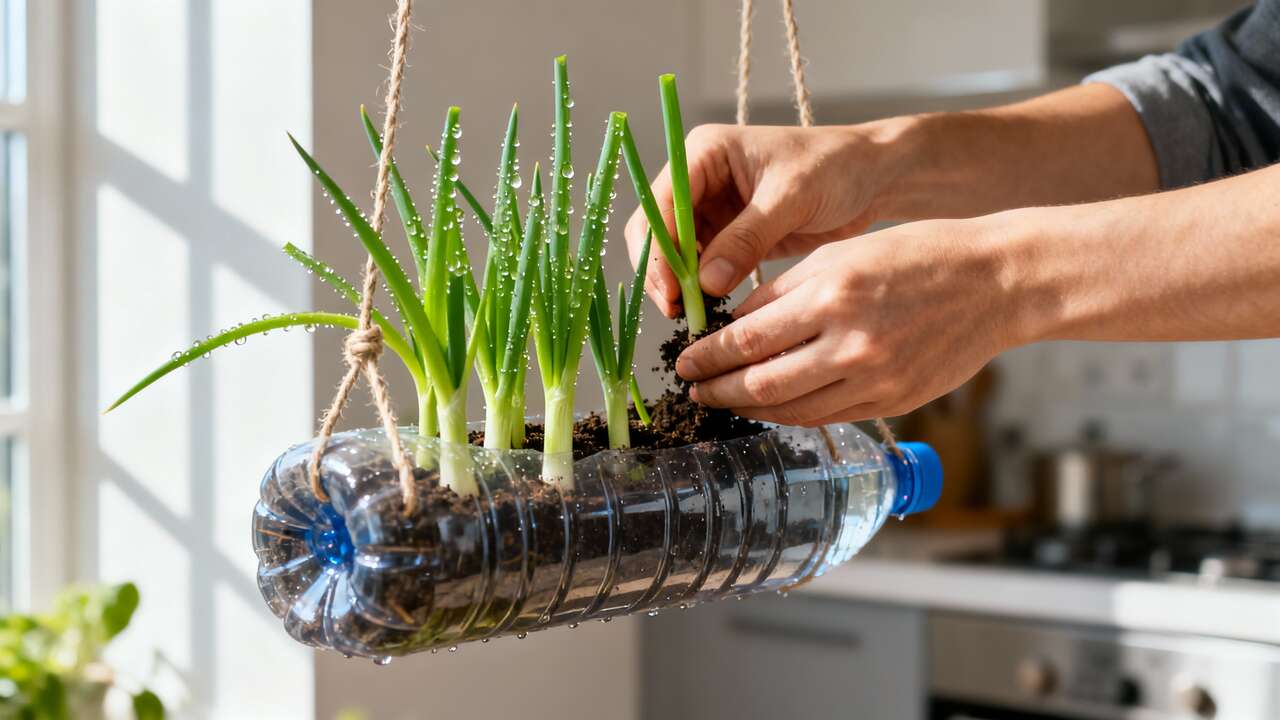
Planting your scallions in the bottle
To plant, begin by adding a layer of potting mix to the bottom of the bottle, up to the level of the first set of holes. Take your water-rooted scallion cuttings and gently guide them through the lowest holes from the outside, so that the root end is inside the bottle and the green shoot is pointing outwards. Add more soil to secure them in place. Continue this process, layering soil and adding scallion cuttings at each level of holes until you reach the top. You can also plant a few cuttings directly into the soil at the very top opening of the bottle. Once filled, water the planter thoroughly until you see water seeping from the drainage holes. You can hang your new vertical garden using sturdy wire or twine wrapped around the top.
Once your scallions are planted, proper care and maintenance will ensure a continuous and healthy harvest.
Maintenance and care of scallions
Light and water requirements
Scallions are not particularly demanding, but they do have fundamental needs. They thrive in full sun, requiring at least six hours of direct sunlight per day. A south-facing window is an ideal indoor location. If you lack sufficient natural light, a simple grow light can provide the necessary spectrum for healthy photosynthesis. When it comes to watering, consistency is key. The soil should be kept consistently moist but never soggy. The clear plastic of the bottle planter offers a convenient window to monitor soil moisture levels. Water thoroughly whenever the top inch of soil feels dry to the touch. Because the container is relatively small, it may dry out faster than a traditional pot, so check it regularly.
Managing potential problems
Indoor-grown scallions are less prone to pests and diseases, but some issues can arise. Proper care is the best prevention.
- Yellowing or browning tips: This is often a sign of inconsistent watering, either too much or too little. Adjust your watering schedule to maintain even moisture.
- Slimy base: If the base of the scallion becomes slimy or mushy, it is typically due to rot from excessive moisture or unchanged water during the rooting phase. Discard affected plants and ensure proper drainage.
- Weak, spindly growth: This is a classic symptom of insufficient light. Move your planter to a sunnier location or supplement with a grow light.
With these simple care guidelines, your scallions will be ready for regular harvesting in no time.
Harvesting and using scallions
The cut-and-come-again technique
Harvesting your homegrown scallions is the most rewarding part of the process. Once the green shoots are several inches tall, typically around six to eight inches, they are ready for their first cutting. Do not pull the entire plant out. Instead, use a pair of clean, sharp scissors to snip the green tops. It is important to leave at least one to two inches of the green shoot above the white base. This allows the plant to continue photosynthesizing and fuels the regrowth of the harvested portion. Using this “cut-and-come-again” method, you can harvest from the same plants multiple times.
Yield, longevity, and culinary integration
A single scallion cutting can typically be harvested three to four times before its productivity and flavor begin to diminish. The subsequent shoots may grow back thinner and less potent with each cutting. At this point, you can simply replace the old cutting with a new one from your next grocery run. The freshly harvested greens have a crisp texture and a bright, pungent flavor that is far superior to store-bought scallions that have been in transit and on shelves. They are incredibly versatile in the kitchen, perfect for garnishing soups, tacos, and baked potatoes, or for incorporating into stir-fries, salads, omelets, and marinades.
This entire cycle, from kitchen scrap to fresh harvest, embodies a simple yet effective approach to sustainable living, transforming a common throwaway item into a source of continuous fresh produce.
- Why experts say you should open your windows when it rains—even if it feels wrong - 10 November 2025
- The ultimate ground cover: why Pachysandra beats weeds and shrugs off winter cold - 10 November 2025
- The secret to attracting robins year-round: why experts swear by these two must-have garden plants - 10 November 2025
Pubblicazioni simili :
 How to Easily Grow Cilantro in a Plastic Bottle: Step-by-Step Guide for Beginners
 How to Grow Rosemary Flowers in Plastic Bottles: A Step-by-Step Guide for Home Gardeners
 How to Grow Bean Sprouts at Home Using Plastic Bottles: Easy DIY Garden Ideas
 Got Rats in the Garden? This Plastic Bottle Trick Works Like Magic